


Smooth Edges - Twisted Stitches - Swatching and Gauge - Knitting a Braid- Tuck Stitch and Picot Hem - Increasing and Decreasing - Color Dominance - Crossover Stitch
Knitting Tip #1 - Smooth Edges
 To keep your edges of your knitting smooth, if the pattern allows for it, slip the first stitch of every row. This means, if you are right handed, that you would transfer the first stitch from your left needle to your right needle without knitting or purling it, and then work the remainder of your row in whatever stitch or pattern as called for in your instructions.
To the left is a picture of garter stitch worked with a slipped stitch at the beginning of each row. What this in effect does is reduce the amount of yarn used at the end stitch, keeping your work a bit tighter and tidier. Newer knitters often have difficulty with tension in their knitting until they become comfortable enough to get a good smooth rhythm going while they work, and this can often be most apparent in the edges.
The other benefit to slipping that first stitch, particularly for newer knitters, is it can make it easier if you have to go back in later on and sew two edges together, since you will have clearly demarked rows to work with. On the other hand, more experienced knitters, whose work (and tension) has become more uniform, may prefer not to slip that first stitch. When assembling a garment, such as setting in the sleeve of a sweater, you will want to have a nice, tight and even "ladder" to work with when joining pieces with mattress stitch. For this, it is in fact preferable to not slip that first stitch since the gap created by that slipped stitch will be to large for "comfort" to work well with a mattress stitch seam.
Having said all this, if you are working on something using a fuzzy novelty multicolor yarn, no one will ever know the difference if you do or don�t slip that first stitch. However, it�s not a bad habit to learn and store away in your "knitting muscle memory".
Knitting Tip #2 - Twisted Stitches
The Plague of the Twisted Stitches
Let me start by saying there is no right or wrong way to knit, however, you do, theoretically, want your stitches to look even and pretty, and you probably want knitting to be fairly easy, smooth and quick.
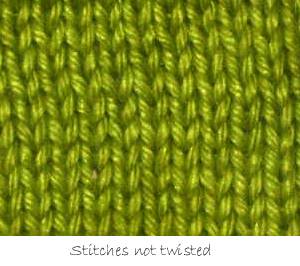
Stitches that are not twisted have the yarn lying in even rows, smoothly bumping up to, but not crossing over it�s neighbor stitch, or itself. The stitch presents itself to you politely on the needle and is easy to pick up and to work. In the stockinette stitch sample, shown to the left, you have nice, even little V�s all in tidy rows.
Then you have the twisted stitch, it fights back, you can�t figure out where your needle goes, it�s hard to work each stitch, your knitting is not as nice as what you�ve seen around you and you start asking yourself at what point does knitting become relaxing??
Twisted stitches can happen a few different ways, and there is not one simple answer as to how they occur or how to fix them as we can all knit differently, and may knit differently one project to the next depending on the yarn, the mood, the needles or just for the heck of it. The causes and fixes are related to the following:
Playing with these four basic elements, (make it eight elements when working alternating knit and purl rows) is what will create or take away the twisted stitch.
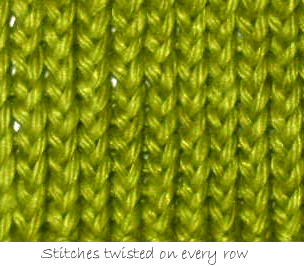
Here is an example of stitches that are twisted on every row. To create this, on my right side (knit) rows, I picked up my knit stitches through the front part of the loop and wrapped my yarn clockwise to creat the Knit stitch. With my purl stitches, I picked up again through the front of the loop and wrapped the yarn under my needle and over, also clockwise.
If you compare this to the first picture, you will see that each little V is now crossed at the bottom, instead of just touching. It�s actually not bad looking, but every stitch was a battle and this sample took me about 3 times as long to work up compared to the untwisted version.
When knitting the 1st sample of untwisted rows, I picked up my stitches in the front for both the knit and the purl rows, and wrapped my yarn counter-clockwise.
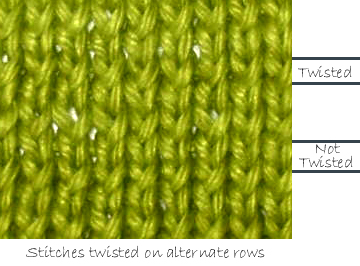
A lot of knitters, when just learning, will have twisted sts on just one row and untwisted on the following. They are still figuring out what goes where, and are feeling all thumbs, wishing they had a third arm to hold anything as it�s all so confusing.
Here in this 3rd sample is what that can look like, I�ve again picked up my yarn from the front, but on my knit rows I wrapped the yarn counter-clockwise, and for the purl rows, I wrapped it clockwise.So, you will see that in all these samples, the only thing that has changed is whether I�ve wrapped the yarn clockwise or not.
Habits are easy to make and hard to break, and the direction the yarn is wrapped is a tough one to change for some. In that case, a way to get rid of the twist would be to pick up your stitches through the back part of the loop, instead of the front and see what happens. So on which row do you do that, the knit or the purl? Again, no real right answer, since it ultimately depends on what you are doing that is causing the twist.
If it is an alternate row twist, then the first thing to try would be to pick up the yarn in back on the row that is fighting you back, you will all of a sudden find the stitch wants to be knitted (or purled), and ta-da! in a few rows you will see the twist is gone!
If you are twisting all your stitches on every row, then it will probably be a two-step trial and error process to see what works best for you, comfortwise, to change, whether it be the direction of the wrap, or the way you pick up that stitch from your needle.
Knitting Tip #3 - Swatching and Gauge
Unless you have a particular fondness for frogging (or unknitting) your hard work, swatching is a must. When you make a swatch you determine many things: how you like the feel of the yarn, how this yarn knits up using particular needles (maybe you find you prefer metal over wood with certain yarns), the stiffness of the yarn based on gauge and how your knitting compares in tension with the manufacturer�s or pattern writer�s suggested gauge are a few reasons. When a designer writes a pattern, they will give you swatch specifications to try to match to make sure you end up with the correct results following their instructions. If your gauge is off, meaning, the you have fewer or more stitches or rows in your swatch, it will throw off all your measurements for your project and you will unhappily end up with a sweater 2 sizes too small or a hat that could fit a Yeti.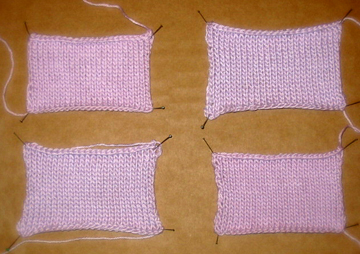
Let�s start with what a manufacturer suggests..theoretically, the figures provided for you on a yarn label are what the yarn distributor or manufacturer has determined based on what they perceive to be the �average� knitter. But here�s the rub.. the yarn shown in the picture to the left is distributed by two different companies. Company A says the yarn knits up at 5 sts/1" on 4mm needles. Company B says the yarn knits up at 5 1/2 sts/1" on 4mm needles. At least they agree on what needles should be used!
As part of my little swatching experiment, the swatches shown here were all done using the same yarn, and same needles, on the same day. We all cast on 25 sts and worked 20 rows in stockinette stitch. Now even at this quick glance one can already see a difference between each swatch. It should also be noted that between the four of us that made up these swatches, we have well over 100 years of combined knitting experience, so be aware that experience makes no difference in your gauge, you don�t get to a point after X number of years and suddenly your gauge is always correct!
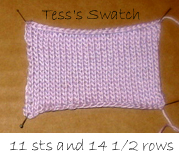
Tess was my first victim. She came up with 11 sts and 14.5 rows over 2". She was right in line with Company B�s gauge.

Next was Sue, she worked up the sample at 11.5 sts and 15 rows, so hers was a smidgeon tighter all around.
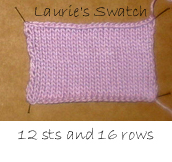
Then Laurie knitted up her swatch which ended up the tightest of all at 12 sts and 16 rows over 2",
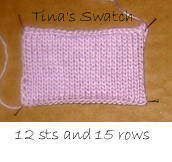
and I did mine last and it landed in between Sue�s and Laurie�s at 12 sts and 15 rows.
So, what is the significance of all this? Well, imagine the four of us decided to make a raglan sweater and the sizes on the pattern are S, M and L. Let�s say the smallest size has a cast on of 90 sts, the M is 95 sts and the Large 100 sts. We each decide to make the Medium. Skipping on the swatch, we each pick up our 4 mm needles and start knitting away. The medium, according to the pattern, should be 19" wide at the given gauge of 5 sts and 7 rows/inch (or 20 sts x 28 rows over 4"). We knit away for a few hours and then take a look at what we�ve got:
We�ve just learned the hard way that our knitting is not the same tension as the designer�s. That difference of 1 little stitch per inch between Tess�s swatch and Laurie�s and mine makes the difference between a medium adult sweater and a child size sweater (let alone the sleeve fitting issues).
Some things to keep in mind when swatching:
A very special thank you to Tess, Sue and Laurie of Greenwich Yarn for knitting up the swatches for me on Saturday - I hope you enjoyed this little experiment!
Knitting a Braid - Video Tutorial
In this tutorial you will learn how to do a two-color cast on using the long-tail cast on method, followed by instructions on how to create a knitted braid - I bet it's easier than you think!
To order the pattern or kit featured in this tutorial, visit the Siena page.
Let us know what you think of our tutorial! Happy Knitting, Tina
Tuck Stitch and Picot Hem - Video Tutorial
In this tutorial you will learn how to create a tuck stich as seen on the Ripley Hat - also includes instructions on how to use tuck stitch create a no-sew picot hem. To order the pattern or kit featured in this tutorial, visit the Ripley page (available in 3 colorways on both cotton or wool).
Let us know what you think of our tutorial! Happy Knitting, Tina
Increasing and Decreasing - Video Tutorial
In this tutorial you will learn an assortment of increases and decreases that we use in our Bramble and Stanley Softies. Do you know the meaning of kfb, kll or krl? What really is the difference between k2tog, ssk and psso? Watch our short video and find out! To order the pattern or kits featured in this tutorial, visit the Bramble page. Let us know what you think of our tutorial! Happy Knitting, Tina
Color Dominance - Video Tutorial
In this tutorial I give you a brief overview of color dominance and how to change the look of your knitting with color - also includes instructions on the central double decrease used in the Nepali Hat pattern.
To order the pattern featured in this tutorial, visit Nepali page. Let us know what you think of our tutorial! Happy Knitting, Tina
In this tutorial you can learn to create the simple but dramatic crossover stitch that is used in the Ophelia Shrug . Let us know what you think of our tutorial! Happy Knitting, Tina
